Pequeno Manual da Prática de Afiação de Laminas.
por Marcos Soares Ramos Cabete
http://www.ebooksbrasil.org/adobeebook/afiacao.pdf
"A afiação de lâminas é algo parecido com o sexo:
• É gostoso de se ver mas dá muito mais prazer se você mesmo fizer!
• A prática melhora o desempenho!
• Não hesite em experimentar novas posições!
• Mas faça com segurança!"
(só esse pedaço já vale a leitura...)

terça-feira, 9 de novembro de 2010
Defesa com Facas
Manual de Defesa com Facas
João Roberto Romeiro Abrahão
Pedro Carlos Gilioli Cavalcanti
Ricardo Nakayama
Clique no link abaixo:
http://www.ebooksbrasil.org/adobeebook/comfacas.pdf
Apesar de ser grande, aconselho imprimir.
João Roberto Romeiro Abrahão
Pedro Carlos Gilioli Cavalcanti
Ricardo Nakayama
Clique no link abaixo:
http://www.ebooksbrasil.org/adobeebook/comfacas.pdf
Apesar de ser grande, aconselho imprimir.

KNIFE FIGHTING
The sight of sharp, cold steel in your enemy's hand is not a pleasant sight. Knife fighting is an ugly business; it means steel against steel; then steel against flesh - and death.
Let's take a look at your enemy's blood.
That's one thing you can't draw from the quartermaster by signing a chit.
But it's a lot easier to draw than size 13 boondockers - you know that your enemy has it ...
You're far behind the lines, maybe you're a communications man operating your switchboard. Your carbine is propped against a tree nearby. Your outfit is in the area but out of sight. You're alone, and you're intent on your job.
You've been warned that there is the possibility of guerrilla activity and infiltration. Your knife is constantly at your side. It gives you a great deal of confidence, but your real assurance comes from your confidence in your own ability to save your own life with that knife by carving out a heavenly military career for your enemy in whatever particular Valhalla he happens to believe exists.
A twig snaps!
You look up from the switchboard.
An enemy is rushing at you, both hands raised-in each a knife!
He's got one objective:
To drive them downward into your chest!
"MOVE, BOY!"
You move. You whip up your knife; you leap into the guard position. Your enemy slows his advance; immediately he realizes that before him is no frightened schoolboy. Instead, he sees a calm, fighting man - poised, ready for instantaneous action, armed with deadly steel, its point directed menacingly at his throat.
You advance cautiously into your proper range, your knife never wavering from his throat. Both of his fists are out in front of him. They are your first targets.
Too late, he realizes that your range is greater than his, and that he has allowed you to come in too close. Like the fangs of a cobra your blade strikes out in a full cut and you are back in your guard position, your blade again pointed at his throat.
There is a dull thud on the ground and a mild ping as the knife falls from your opponent's left hand, along with parts of his fingers if your cut has been accurate and hard.
You have stunned your opponent; you can afford a split second before pressing the attack. From your guard position you lower yourself quickly, and with your blade still pointed at his throat, you scoop up a handful of dirt and return to the guard position.
You are ready for the kill. Your enemy is now in a do or die rage; his only thought is to kill YOU any way he can. He raises his blade beside his head and charges.
You heave the dirt, execute an in-quartata, and yell. Your target is his heart.
As he hurtles by the spot you vacated a moment before, your blade is almost wrenched from your hand as it cuts its way out of his body.
Your opponent is now lying about five yards beyond the spot in which he had intended to leave YOUR lifeless form.
Cautiously you inspect the corpse of your enemy. Your job was clean. There was no need for in-fighting.
"Just like that?" you ask cynically.
We nod.
"But that wasn't me in that knife fight," you insist. "It must have been some other guy, an expert, maybe..."
You don't need to be an expert to stand your ground in the guard position and engage an enemy with confidence. A sound KNOWLEDGE of knife fighting and PRACTICE of its basic PRINCIPLES will make you a dangerous opponent for any knife-wielding enemy.
Knife fighting is based on the age-old science of swordsmanship. These principles of swordplay were utilized by James Bowie in his fine technique with his Bowie knife-making Bowie and the Bowie Knife one of the deadliest blade combinations the world has ever known,
HOLDING THE KNIFE
Here, take this knife.
Now, hold it straight, NOT cocked upward. Put your thumb directly on top of the handle, on the SAME side as the FLAT EDGE of the blade - that's right, the cutting edge faces DOWNWARD.
Now, clamp the fingers securely UPWARD around the handle. Lock your wrist when the ELBOW and the POINT of the knife are in a STRAIGHT LINE. THE KNIFE IS MERELY AN EXTENSION OF THE FOREARM.
Keep the thumb about a quarter of an inch from the thumb guard. This space is allowed to take up the shock caused by the impact when your knife strikes its target.
Tips
1. Keep the wrist LOCKED at all times.
2. DON O arch the thumb on the thumb guard.
3. Keep the blade ON LINE with the FOREARM.

The hold. Fingers are wrapped securely around the handle, thumb on top, point of your blade is on a line with the elbow
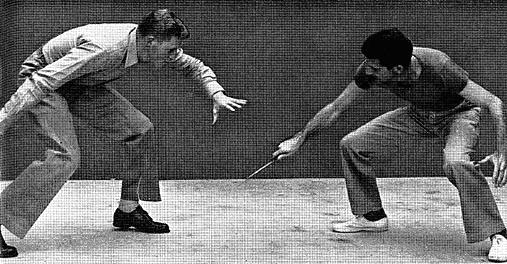
THE STANCE
The proper fighting GUARD position is taken directly from the stance of the skilled swordsman. There are only two changes. These changes are made, only when learning, after the proper SABRE STANCE has been assumed. In actual combat you snap IMMEDIATELY into the KNIFE FIGHTING GUARD POSITION.
THE SABRE STANCE
1. Face your opponent at attention.
2. Execute a LEFT FACE.
3. Execute a "close interval DRESS RIGHT." (Glance at your opponent, placing the left hand on the hip at the same time.)
4. Point your RIGHT FOOT at your opponent and advance it about TWO FEET in his direction.
5. Raise your RIGHT FOREARM, aiming the point of your knife directly at your opponent's throat. Your ELBOW will be approximately six inches forward from your HIP.
6. The knees are slightly bent until the lower part of the RIGHT LEG is straight up and down-ready for instantaneous advance or withdrawal.
7. The CUTTING EDGE of the blade should be facing DOWN and to the RIGHT in an unstrained, natural position.
8. YOUR WRIST IS LOCKED.
9. Keep the upper part of the body ERECT at all times. This is the proper SABRE STANCE. Notice how easily you are able to advance and withdraw-forward and backward. Movement to
the left or right is more difficult.
In practice, a knife, bayonet or stick may represent the sabre.
To assume the knife duelist stance from the sabre stance
1. Assume that there is a STRAIGHT LINE between you and your opponent. Move your REAR foot from one to two feet LEFT of this line, forming a 90 degree angle to your opponent with your feet. IN THIS POSITION YOU HAVE COMPLETE STABILITY. You can propel yourself easily and quickly either BACKWARD or FORWARD or to the LEFT or RIGHT.

The sabre stance, foundation for the knife fighter's stance

Sabre stance to knife fighter stance. Move rear foot to left

The guard position. Left arm free. Knife arm drawn back

The thrust. Blade drives into target. Free arm snaps back
2. Draw the arm which holds the knife BACK, CLOSE TO THE BODY and, at the same time, square your shoulders to your opponent. In sabre fighting the arm can be safely extended because the weapon is long and the handle is equipped with a hand guard. In knife fighting you have a lightning-fast blade but there is little protection for the hand.
3. The LEFT ARM swings FREE of the body.
Your body should be relaxed WITH THE EXCEPTION of the LOCKED WRIST and the THIGHS which are taut because of the bent knees.
Your shoulders face your opponent squarely. In this position there will be no lead with your shoulder and knife betraying the nature of your attack.
The guard position will become a natural reaction. Place a sabre or a rapier in the hand of an experienced duelist and he will immediately snap into the guard position with a reflex action almost as strong as drawing the hand from a hot surface. This may be difficult to understand at first, but be assured, it is true and after a moderate amount of knife-fighting practice, you'll find yourself assuming the guard position without thinking about it, the moment you have a knife in your hand.
TIPS
1. Keep your feet at about a 90 degree angle.
2. The blade is drawn in, close to the body, and held in an unbroken line from your elbow to the point.
3. Shoulders face the opponent squarely.
4. Torso and head are held erect.
5. The arm on hip should swing free, but care must be taken to prevent it from extending beyond the hand which holds the knife.
6. Your blade points directly at your opponent's throat. PRACTICE all the points of the proper stance until you can draw your blade on command of "On Guard!" and instantaneously snap into the perfect position without losing a second to make major adjustments.

The side view of the guard position. Major portions of the body will not be extended into an opponent's range

The straight thrust, side view. The torso pivots on axis of spine. Your legs provide added range
PRACTICE until ALL of the points in the ON GUARD position become coordinated into ONE natural movement.
ALL OF THE ATTACKS AND DEFENSES OF THE SKILLED KNIFE FIGHTER ORIGINATE FROM THIS GUARD POSITION.
THE THRUST
From the guard position, the blade is thrust forward with explosive force DIRECTLY at the target. The free arm is whipped back to add power and velocity to this POINT-AT-TARGET attack.
The BLADE POINT travels straight to the TARGET, backed by the full power of the forearm and shoulder.
The THRUST starts with the knife, poised and ready in the guard position. NO PRELIMINARY MOVEMENT IS NECESSARY. The blade is snapped directly to the target. If the target is your opponent's throat your point should strike in a direct line to the throat.
On the thrust, the free aria has been whipped back, TURNING THE FULL BODY WITH A SNAP. Instead of the full spread of the shoulders and chest which had been exposed to your opponent, you now present the NARROWEST view of your body. The upper portion of the body has pivoted forming a straight line from your blade point back along your arm, across the shoulders and down the free arm in the rear.
In executing the thrust, the beginner will have a tendency to lean forward and push. The result of a push is usually an UNEVEN and weak action. Your attack should be instantaneous. From the front, your opponent should see only the blur of a point on the extended arm, and the sudden disappearance of the broadside view of your upper body; in its place, your enemy will find only the thin silhouette of the NARROWEST portion of the torso.
The attitude of your blade, well back and pointed at your opponent's throat, is like a pistol leveled at a target - ammo in the chamber, the hammer back, your finger on the trigger. The point is your bullet.
THE THRUST, when properly executed with your opponent withinithin range, will be so swift that he'll never see it.
He won't know what hit him.
He won't see it coming.
Nor can he PREVENT getting HIT.
This is true in professional boxing. If an opponent is open and in range of a left jab, he's going to be hit.

If an opponent tries to make an underhanded attack he will come within your range but you will still be out of his reach

Your advantage over your opponent is a range of eighteen to twenty-four inches. If the enemy attacks, he comes into range
The only way to avoid getting hit is NOT to be THERE to get hit. Simply said. Simply explained - later. But here's a hint:
DISTANCE is of utmost importance. It is INSURANCE again
NOT being THERE to get hit, AND STILL BEING IN A POSITION
TO run your opponent through.
TIPS
1. When THE THRUST is executed in practice and the blade is not driven into human flesh; the blade completes its thrust in mid air where it stops abruptly with a NATURAL WHIPPING ACTION.
It is the conviction of the writer that the Bowie-shaped blade was scientifically designed by James Bowie for the control of this natural whip.

If your opponent tries an overhand stroke he must come in close; your straight thrust pivots your chest out of his range
2. The THRUSTING HAND, when fully extended, should have the KNUCKLES UP, the THUMB LEFT and the knife arching slightly downward into the target. The FULL thrust is executed regardless of your opponent's distance-as long as he is IN RANGE.
3. Do not be too anxious to draw the weapon back prematurely. Let the extended arm SNAP OUT TO THE FULLEST.
4. Only in a well-executed thrust which does NOT strike home, will you find the whip-like movement of the blade. When the point reaches its target, penetrating flesh or bone, the whip is taken up by the substance which is hit.

An enemy's overhand stroke leaves him wide open for your thrust. He can be stopped before he reaches effective range
THE CUT
The thrust is the foundation of the CUT. With the thrust you take your knife to the target. If a FULL thrust does not strike the target the natural whipping action will take place. This whip is THE CUT.
THE VERTICAL CUT
The VERTICAL CUT is a thrust which ends abruptly with the THUMB UP, the NAILS to the LEFT.

When this thrusting cut goes straight to its target ins+ead of ending in mid-air, this same whipping action will take place

The vertical cut - fast and effective for a long range slash. Whip down

The natural whipping action of the thrusting cut makes the blade drop
An extended extremity, such as a protruding arm, is an excellent target for the VERTICAL CUT. In this cut the blade flashes DOWN and UP, biting gashes into the flesh or lobbing off fingers. The blade, when executing this action does not only whip DOWN and UP, but when it is viewed from the side, the observer will notice that it also RIPS FORWARD. Where a stiletto or narrow pointed knife would penetrate like an ice pick and leave a puncture wound, the Bowie-shaped blade will whip down into the target, ride forward, then snap UP.
THIS IS ONE CONTINUOUS ACTION. The movement has been completed in one ninety-fourth of a second when recorded by a highspeed camera.
All tissues, muscles, veins or tendons caught in the path of the scimilar-like hook of the Bowie blade will be sliced clean through.

Keep full thrust's distance from opponent's nearest extremity. If nearest target is hand or forearm, execute a thrusting cut

The vertical thrusting cut to the hand. The blade is cocked in preparation for a wrist action to supplement the natural whip

Vertical thrusting cut ends with the blade biting down, ripping forward, then snapping up again - all in a continuous action
THE HORIZONTAL CUT
The HORIZONTAL CUT, straight across and back. is purely an unfulfilled normal thrust.
The tendency of the average knife fighter to crouch usually places his head and face in such a position that they present excellent targets for the HORIZONTAL CUT.

The horizontal thrusting cut. A full thrust is directed to right side of your target. Slightly cocked blade assists whip action

The blade will whip across its target automatically when the arm is fully extended. Try for cuts on enemy's head or face

The finish of your horizontal thrusting cut. The blade whips back across target, achieving two cuts with only one thrust
THE HAND CUT
The HAND CUT can be an exquisitely executed attack. From the hand of a skilled knife duelist this cut, practically unknown to the overhand or underhand knife fighter, can usually be relied upon to effectively strike the first blow. A deeply sliced hand will greatly reduce the strength of your opponent's knife hand, but if you hack off a few fingers with your initial HAND CUT you have it made!
PRACTICE
These cuts may be practiced with an actual or simulated weapon, but when learning, the use of the hand in lieu of the weapon is advised. Master the whip of the HAND and you will develop a better understanding of the action of the blade.
When the hand alone is used, the fingers should be extended and joined; the edge of the hand opposite the thumb becomes the imaginary cutting edge of the knife. The hand is thrust out vigorously, coming to an abrupt halt at the fullest extension of the arm. A whip-like snap of the hand will take place. This practice will be valuable if you are ever confronted by an opponent when you are unarmed, for the edge of the hand, in this position, is used like an axe; the fingers joined at the tip are like the point of a blade.
After mastering the cut as directed, you may then increase the effectiveness of the blade by a snapping WRIST action in a whip-like manner, directing the cutting edge of your blade to its target with greater velocity. This sharp wrist-snapping cut is of utmost importance when tiir target is so close that it must be reached without fully extending your arm.
TIPS
1. When learning the full extended cut, which is a result of the unfulfilled thrust, there will be a marked tendency to assist the action with wrist movement. AVOID THIS WHEN LEARNING. The cut is a completely natural action of the arm. Later when you understand this natural action, you may add additional wrist action to supplement the natural whip.
2. Draw the blade back to the guard position immediately after the cut is made.
3. Keep the blade pointed at the throat at all times except when making definite attacks to other targets.
4. Practice executing the full VERTICAL and HORIZONTAL CUT until the action is clean. The blade must avoid making circles at the full extension of the arm. These circles are the result of forced action of the wrist or forearm, preventing the NATURAL ACTION of the blade.
5. Begin your practice with the hand so that you may better understand and control the whip action.
6. Continue your practice until you work out the stiffness in the elbow joint. The tendons in this area will feel the strain while you're learning the thrust and cut.

The in-quartata or out-of-line starts from the guard position. Conceal the nature of your attack until opponent is in range
IN-QUARTATA OR OUT-OF-LINE
The defensive movement in fencing known as in-quartata or OUT-OF-LINE is a fine movement of the feet which throws the body approximately three feet out of the line of your opponent's attack if he attacks with so much force that you do not choose to be there to meet it with a stop thrust.
From your guard position, knees slightly bent, you execute a full thrust as the torso vigorously pivots, assisted by the free arm whipping back.

When opponent rushes into range, thrust home and apply power with the rear leg, directing the body to the right side
You will also utilize the FULL POWER of your REAR leg to pivot the whole body on the FORWARD leg. Your rear leg swings around in an arc and lands on the opposite side. Your entire stance should now look like a full sabre thrust from a sabre stance, but YOU ARE AT AN ANGLE TO YOLR OPPONENT.
Your opponent's momentum will carry him over your original position, by about two or three feet. There will be no need for you to withdraw your blade from your opponent, his momentum will carry his BODY OUT OF THE BLADE!

Your rear leg will push off and swing to the right, pivoting the body out of line with the oncoming rush of your opponent

The full pivot out of line, with your rear foot solidly planted. Retain your full thrust, letting the opponent cut the blade out

If you attack an enemy from the rear or flank, try a straight thrust to the throat with the full edge, not the point, of your blade. Immediately draw the knife back, snapping the cutting edge of the knife across opponent's throat, making two cuts
DISTANCE
Now we're going to try to clear up some of those doubts in your mind.
Sure, your opponent's got a knife - maybe he's got two knives.
And maybe he knows how to use them.
But, here and now, we want to cut you in on a big slice of scoop - IF YOU'VE GOT A BOWIE KNIFE IN YOUR HAND you're armed with a BETTER WEAPON than any other nation in the world has ever devised.
And that's only half the scoop. A KNOWLEDGE of the BASIC PRINCIPLES of the use of the Bowie knife or ANY BLADE simply means that you'll be able to save your blood for a Stateside blood bank instead of leaving it on the battlefield.
Up to this point you've learned three basic principles:
THE GUARD POSITION.
THE THRUST.
THE CUT.
"All of this," you will say, "is fine on the drill field or in a gym, but what do O do when I'm in combat and a crazy enemy comes chargin' at me with a wicked lookin' dagger? The guy's gonna kill me if I don't do something to stop him!"
You're right. He'll kill you if you don't do something immediately to discourage him.
CONFIDENCE in YOURSELF is your primary MENTAL attack. A bucketful of his wild zest will drain from him when he sees you plant yourself in the guard position and DEFY him. He'll stop in his tracks and think things over. You have won part of the mental duel. but the physical bout has just begun.
SIZE UP YOUR OPPONENT.
You will be able to judge the EFFECTIVE RANGE of your opponent immediately by the way he holds his blade and the stance he takes.
If your opponent has his blade in his RIGHT hand and has his LEFT foot forward, he will telegraph his attack with a body movement, even if he holds the blade in the sabre manner.
If he holds the blade in the OVERHAND or UNDERHAND position, or in any position other than that of a sabre, he will definitely LIMIT the effectiveness of his RANGE. This is the predominant stance of most knife fighters throughout the world in spite of the fact that it is contrary to the 400-year-old fencing principle of keeping the RIGHT FOOT FORWARD.

(A) Keep yourself out of range of your opponent's full thrust. If he attacks, you'll be forcing him to come into your range
If he extends his knife-holding hand to any marked degree, regardless of his grip, he is also LIMITING his range.
With practice, you will IMMEDIATELY notice these errors in your opponent and TAKE ADVANTAGE OF THEM.
If you are confronted by an opponent who displays these errors, the rule is simple:
STAY ONE FULL THRUST'S DISTANCE AWAY FROM YOUR OPPONENT'S NEAREST EXTREMITY.
From this range you will be in a position to continually SNIPE at him with LIGHTNING-LIKE cuts. You will be amazed to find that, although he is in range of getting cut by your blade, he cannot try for a cut on you without missing by ONE or TWO FEET.

(A) Above picture shows your opponent in the same position as in (A) on opposite page, but you have been able to advance
If your opponent should BODILY ADVANCE in an attack, MAKE IMMEDIATE USE OF YOUR LEGS: they are slightly bent in the guard position and ready for instantaneous action. If your enemy's advance is slow, you merely STEP BACK - REAR foot FIRST, followed by the FORWARD foot.
If you are pressing the attack aiul arc advancing, your first step will be made by the FORWARD foot; bring the REAR foot up BEFORE taking a second step with the FORWARD foot.
If your opponent assumes a skille'd knife duelist's stance you will recognize it immediately - AND BECOME EXTREMELY CAUTIOUS. He will be OUT OF RANGE. You will have NO immediate TARGET, and you will have to work hard to GET one.

The slightest extension of your opponent's knife hand presents a target. Strike and recover immediately to a guard position
With THIS opponent:
1. Your DISTANCE will be INCREASED. Stay one full thrust's distance from his full thrust's distance. The distance is from HAND to HAND. Your blade fully extended to his hand; his blade fully extended to your hand.
2. Usually the HANDS will be your targets.
3. The duel is on, and you will have to resort to fencing TECHNIQUES to draw him into your range.
4. Attack your opponent when he is LEAST alert to your attack. When you sense that HE is about to attack, he will be thinking of HIS OWN strategy - NOT of his own defense.

Draw your opponent into an attack but keep your body in a well-balanced position and out of opponent's striking distance
5. You may wish to attack when your opponent is IN MOTION - EXECUTING an attack or RETURNING from one. In this moment, his LACK OF BALANCE and the DISTANCE will be definitely IN YOUR FAVOR. Once you have launched your attack, catching your opponent off balance, force vour attack with straight thrusts and cuts.
DISTANCE and TIMING are closely allied; distance is a matter of keeping within a safe defensive range, and at the same time, being within an effective offensive range. Timing is something you will always have to FEEL; it is the ability to recognize the proper moment to attack.

If your hand is too close to opponent's knife for a thrusting cut, try for a sabre cut - a full, snapping chop at knife hand
TECHNIQUE
Technique is the ability to combine basic principles with their best possible application to make the most skillful and formidable attacks against an opponent. Crudely put, it is the use of every trick you know to get your blade into your opponent.Technique is NOT a sometimes thing; you acquire it with the PRACTICE of BASIC PRINCIPLES, in your own, individual manner.It will PAY OFF in blood on YOUR blade...
TARGETS
After the fight you'll probably want to wipe off your blade. But if you don't hit anything you won't have to clean it; as a matter of fact, if you don't hit anything, your opponent probably will and what he hits will be PART OF YOU.
LOOK for targets on HIM, and let them feel your steel. IN A KNIFE DUEL, ANY TARGET IS A GOOD ONE TO BEGIN. THE KILL, HOWEVER, IS THE ULTIMATE.
Here are your targets:
1. The hand that holds his blade.
2. The heart which pumps his blood.
3. The throat which contains his windpipe and blood supply to and from his head.
4. His chest area which contains his lungs, heart, diaphragm and various other things he'd rather not have punctured.
5. His back, below the shoulder blades. Thrust the knife INBOARD, toward the center of his body. Work your knife handle back and forth; this will do far more damage than a single thrust. In any portion of the back, chest, stomach or throat area PUMP THE HANDLE OF YOUR KNIFE.

For an enemy attack, feint a low attack; draw his weapon low

When the opponent lowers his blade, attack his hand or wrist

Whip the blade up for a thrusting cut to your opponent's head
 Attempt a straight thrust for your opponent's head or throat
 Passata sotto, an alternative for out-of-line. If your opponent rushes with exposed lower right side, thrust to lower chest
PASSATA SOTTO
Another means of getting your blade into your opponent, other than the direct manner from the guard position, is to perform a passata sotto in which you merely BEND THE TORSO VERY LOW and to the LEFT from the guard position. Thrust directly into the LOWER RIGHT CHEST or ABDOMINAL AREA of your opponent. This is a fine attack against an opponent who raises his right arm high in his attack, or otherwise exposes his lower right side. In some instances a left step may accompany the attack.
This movement is also excellent for FAKING a low cut, drawing your opponent's blade low, whereupon you strike for his HAND, FOREARM or HEAD. If he refuses to be drawn low, you may safely risk an attack on his KNEE CAP.

A feint, made to look like an actual attack, should affect your opponent's reflexes, causing him to lower an offending guard

A full thrust or cutting attack may be made on your enemy's momentarily open target. Low crouch puts his head in range

Keep your free hand in constant readiness to block enemy's blade arm. When it comes in range grab his wrist and thrust
This movement is also excellent for FAKING a low cut, drawing your opponent's blade low, whereupon you strike for his HAND, FOREARM or HEAD. If he refuses to be drawn low, you may safely risk an attack on his KNEE CAP.
A feint, made to look like an actual attack, should affect your opponent's reflexes, causing him to lower an offending guard

A full thrust or cutting attack may be made on your enemy's momentarily open target. Low crouch puts his head in range

Keep your free hand in constant readiness to block enemy's blade arm. When it comes in range grab his wrist and thrust
YOUR FIGHTING KNIFE
A stout blade of fine steel is the prerequisite when you go shopping for your knife. The blade should be tough enough to resist most impacts without showing a fixed bend. When severely strained beyond the point of returning to its original position, the blade should bend instead of snapping off. The steel should be hard enough to hold an edge.

Clamp down hard on your opponent's wrist; at the same time move your body in close and thrust your blade into the target
The knife should be from seven to ten inches in length and resemble the form of the traditional American Bowie. The handle should be long enough to fit comfortably and securely in the palm. The weight of the handle should equal the weight of the blade in order to avoid the feeling of "blade-heaviness" when the knife is "hefted." The balance should be near the guard, preferably on the handle side.
Your knife should be equipped with a scabbard that can be secured to the person in a manner which will make it possible to draw the knife easily and quickly by a natural movement of the hand. The scabbard should be secured vertically on the outside of the right thigh. If this position is impractical because of other gear or heavy clothing, the scabbard may be carried in a horizontal or diagonal position on the front or left front beltline.
Regardless of where the knife is carried, it should be in constant readiness for instant use.
WE REPEAT:
Knife fighting is an ugly business; we hope and pray that you'll never meet an opponent armed with a blade, the look of a madman in his eyes, hatred in his heart, and the momentary lust for YOUR life.
But you might.
And in combat only ONE opponent comes out of a knife fight alive. If we have succeeded in giving you CONFIDENCE in your own ability with your knife, by these prescribed PRINCIPLES; if we have been able to convince you that your enemy, whoever he is, HASN'T GOT A CHANCE with HIS knife; then we have given you something with which to save your OWN life.
JOHN STYERS by Carl Cestari
Most people have only been exposed to John Styers work through the book "Cold Steel".
It is important to remember that first and foremost this book outlines a BASIC course of close-combat instruction. The elements covered in this system include bayonet, knife, stick and unarmed combat. Styers developed this "system" for BASIC training.
The framework of all of these methods remains CONSISTENT through out. The fundamentals for employing the bayonet, knife, unarmed combat and even the stick work are ALL the same.
Note in particular the "stance" used for the bayonet, the knife, and for unarmed engagement. SAME stance. The "body" mechanics involved in all the methods presented are at their core foundation ALL similar. This in itself shows "genius".
What we see in "Cold Steel" is NOT the STYERS method! It is a "system" that STYERS developed for use in BASIC training. John Styers was a man of both great knowledge and SKILL in a number of man to man combatives.
Those who knew Styers personally have told us about his vast interest, knowledge and proven skill in a number of close-combat methods. From the "French" style of bayonet fighting, to "Russian" knife fighting, to boxing, wrestling, jiujitsu, and of course "dirty" fighting.
As concerns the STYERS knife work as shown in "Cold Steel" it must also be considered that this was but a SMALL part of Styers overall skill and ability in KNIFE FIGHTING. Again this was a system of BASIC TRAINING!
Other sources show this quite demonstrably. The man was a MASTER of bladework.
Now the knife sytem taught in "Cold Steel" is excellent. The "problems" that are often cited by others has FAR MORE to do with a lack of understanding in the tactics and techniques as "they" present them, than it does any practical faults in STYERS method.
ON TO THE METHOD
First, Styers was training men for battlefield COMBAT! NOT for a "duel". He assumed(rightly so) that in the so-called "fog" of war men will revert to pure "animal" instinct and move right in for the "kill". Think about this! During the frenzy of real combat you and your enemy are REDUCED to fighting with knives. Men are killing and being killed ALL AROUND YOU. YOUR natural instinct for SURVIVAL will seize you by the throat. You will grip that knife as strongly(your LIFE NOW depends on THIS ONE WEAPON) as possible and MOVE RIGHT IN FOR THE KILL!(WASTE ANY TIME and someone else is going to KILL YOU) You are NOT going to "spar" or "duel", you ARE going to KILL, survive and move on to your next threat or objective. Styers KNEW what real "kill or be killed" combat was like. He realized that MOST men in this dire situation will instinctively SEIZE their knife either in an "overhand" or "ice-pick" grip or an "underhanded" type "hammergrip". They will ATTACK with a determined KILLING intent. THAT IS THE BASIS for the Styers method!
Now the "elements" of Styers method rest on BODY position, ARM position, and KNIFE position.
Here is where so many "experts" go right OFF TRACK. Forget any "technique", thrust, slash or "whatever". WITHOUT the FOUNDATION of proper BODY, ARM, and KNIFE position all the "technique" in the world is MEANINGLESS!
Without a REAL understanding of Styers FUNDAMENTAL tactic and what MUST be done to make it EFFECTIVE, all THIS becomes NO MORE than two guys trying to cut and stab each other. THIS IS NOT what Styers envisioned.
On to the "meat & potatoes":
1. Stance-
Whether you assume the "Styers" position from a "classic" fencer's pose, as Styers demonstrates(for continuity) or simply advance(lead leg) retreat(real leg) one pace, as long as your UPPER torso remains square and you body rests "springlike" on your legs you're doing OK. BALANCE must be rested on your center point and the rear heel RAISED. Toes and KNEES pointed FORWARD!
KEY POINT: Body SQUARED. Torso ERECT. Chin PULLED IN. BALANCE centered. Rear HEEL RAISED.
2. Arm Position-
Gripping the KNIFE: Blade vertical to ground. Thumb EXTENDED down backstrap. Slight upward CANT or "cocking" of blade.
Weapon bearing hand and arm: Pulled IN. Upper arm slightly BACK from vertical. Elbow tucked into, not away from side. LOWER ARM raised on a plane EVEN with opponents THROAT/EYES. Weapon hand SHOULD NOT break the latreral plane of the upper torso! THIS IS KEY!
Offhand hand: Pulled in just like weapon bearing hand.
COMMON ERRORS:
Wrong foot placement.
Leanining over or into the opponent.
Chin/Head THRUST out.
WEAPON HAND EXTENDED and/or SPLAYED OUT!!!
Read THAT AGAIN!
Knife LEVEL with ground and NOT POINTED at opponents EYES/THROAT!
Offhand SPLAYED out to side.
Now the WHY'S that make this method succeed or FAIL.
First, try this experiment(THIS IS SOMETHING YOU MUST DO). Don't even talk about this "method" if you HAVE NOT honestly followed this example:
Grab a REAL SHARP FIGHTING KNIFE. EXTEND IT at FULL arm's length with shoulder "twisted" in for added reach.
Tell your training partner to DISTANCE himself from the weapon to a RANGE where he feels at a combatively "SAFE" range. Have someone measure that distance.
PULL your weapon arm in to a 3/4 extension and repeat. Have someone measure that distance.
PULL in FURTHER to a half bent 90 degree position and repeat.
NOW pull the weapon back to the hip and do it all again.
COMPARE the measurements at each "distance". MOST people will REMAIN quite consistent in the ACTUAL "measured" distance of safety from tip of weapon. THEY will ALMOST always MOVE in as YOUR arm moves back, BUT the "measured" distance remains very close between ALL the given positions.
THAT is the KEY to Styers.
Extend your arm and knife all the way OUT. Your partner maintains that critical safety zone FROM the tip of your very real and sharp blade. COULD YOU cut or thrust him EASILY from that position? Not really. A committed BODY lunge or step is about all you could do to close the "gap". Too slow.
NOW-Pull that arm ALL the way in so that it barely breaks the lateral plane of the body. AGAIN, your training partner will have a DEFINITE tendency to MAINTAIN the measured distance of the safety zone, but HE will MOVE in. The actual measured distance between him and the tip will vary little. HIS safety zone is STILL his safety zone.
What HAS changed is your ABILITY to REACH HIM in the fastest most NON telegraphed manner.
FROM the PULLED IN arm position, SQUARED TORSO, and BALANCED stance you can execute the most rapid, cobra-like attacks or counter-attacks with a great amount of RANGE.
ANY position OTHER than this one, taken by your enemy WILL put him at a SERIOUS dis-advantage. He will almost ALWAYS be offering YOU something, whereas YOU will be offering NOTHING.
His range and speed will be effected by HIS position. Your range and speed will be ENHANCED by YOURS.
IMPORTANCE of BLADE POSITION:
Keep that blade tip POINTED at the angle stated. WHY? At that angle it is MUCH more difficult for the opponent to gauge the size and length of your blade. May seem like a MINOR "point", but in a real KNIFE fight I'll USE anything that MAY give me an edge.
TECHNIQUE:
ALL you REALLY need is a thrust, a snap-slash(DO NOT use the back snap cut with this!), a "stop-hit", and the "hand-cut". The step over and stab is also useful.
If "In-Quartata and Passata-soto" are NOT comfortable for you, DON'T use them! Since BOTH of these moves are MEANT as "defensive" counter-attacks against an OVERLY committed assault they are NOT mandatory.
The FIVE moves stated above are MORE than enough. PRACTICE THEM moving forward, backward and flanking left and right. I personally DO NOT train the "back" snap cut on the "snap-slash" because I know of an incident in a real fight where the knife was dislodged from the grip on the "return" when the target reflexively pulled his shoulder up after taking the first slash across the right temple and eyes. This is the story I have heard so I won't comment further.
TARGETS: As far as "targets" go...............well the BEST real world advice I can offer is just GO for FLESH! If you see skin, GO FOR IT!
Fingers, hands, wrists, throat/neck and face. The "step over and stab" SHOULD be saved for the coup d' grace.
John Styer's influence was really BROUGHT to bear AFTER WWII. His methods were developed during the Korean War era, long after his discharge from the USMC.
Ok, hope some of you got some useful insight.
segunda-feira, 8 de novembro de 2010
The Fairbairn Manual of Knife Fighting


The Fairbairn Manual of Knife Fighting
William Ewart Fairbairn's Lost Classic
William L. Cassidy
--------------------------------------------------------------------------------
Introduction
In February 1977, Lieutenant Colonel William Ewart Fairbairn's son, Major John E. Fairbairn, OBE, presented me with an unpublished document on the subject of knife fighting. This document was written by his father in 1955. It takes the form of a typewritten manuscript, with numerous holographic notes in Lieutenant Colonel Fairbairn's own hand. It was never titled, nor was it ever completed.
In 1975, I had written a book entitled Complete Book of Knife Fighting, wherein I made mention of Lieutenant Colonel Fairbairn. Accordingly, his son requested that I edit, revise, and rewrite the manuscript for publication.
Revision and rewriting was to be accomplished on the basis of instruction in the form and style of knife fighting covered in the manuscript, together with such other material that I deemed useful. Major Fairbairn gave me such instruction in sessions at his home. Pronouncing himself satisfied with the result, he next presented me with his father's personal edged weapons, prototypes, and service revolver, as well as his father's personal papers.
I have delayed publishing this work for twenty-two years. The delay was at Major Fairbairn's request, made for reasons that must remain in confidence.
In the following, I have engaged in strict historical editing practice. I provide text exactly as encountered in the original manuscript. I make special note of the author's excisions and additions. Material that I have added is so identified.
This is a unique and historically significant document on the art of knife fighting. I have elected to make this electronic edition openly available, in order to preclude the material's exploitation by unscrupulous firms and individuals who seek to unfairly trade upon Lieutenant Colonel Fairbairn's name and the wide respect it engenders.
You are at liberty to read and study this material via the World Wide Web. I respectfully ask that no other use be made, inclusive of hyperlinks, downloading, adaptations, interpretations or unattributed quotations, absent prior permission.
This material is first posted 2 February 1999.
William L. Cassidy
--------------------------------------------------------------------------------
Contents
Flyleaf copy (by Fairbairn)
PREFACE
No. 1 STANCE
No. 2 THE GRIP
No. 3 EXERCISE "A"
No. 4 EXERCISE "B" - THE "WHIP"
No. 5 EXERCISE "C" - "FIGURE OF EIGHT"
No. 6 EXERCISE "D" - THE SLASHING CUT
No. 7 EXERCISE "E" - THE THRUST or POINT
No. 8 THE CIRCULAR-BACKWARD SLASH
No. 9 SHADOW-FIGHTING
No. 10 THE "RETREAT"
No. 11 ATTACK POINTS
POSITION OF CARRYING THE "COBRA" FIGHTING KNIFE
DIS-ARMING A KNIFE FIGHTING OPPONENT??
(Fly leaf)
The Author has been an ardent student of Self Defense in all of its branches for a great number of years. In the course of these studies he received expert instruction in the art of Chinese "Boxing" from one of the retainers of the late Dowager Empress. He received special instruction in Foil and Dagger fighting from several of the finest Instructors in the Far East. Although a non-resident of Japan, he was admitted to Kodokan Jui-Jitsu University, where he was eventually awarded the Black Belt (NIDAN) = Second Degree.
During his career he has held appointments as Chief Instructor in Close Combat Fighting to the Shanghai Municipal Police, British Commandos and the Office of Strategic Services, U.S.A.
Combing all this knowledge, plus practical experience gained during over 2,000 Riot Calls in SHanghia, he is now publishing his latest book on Knife Fighting. This manual describes methods developed and practiced over a number of years and in spite of their un-orthodoxy, they have stood up to the practical test during World War II in the Far East and elsewhere, and becomes a "must" book for all men serving in the Armed Forces.
Previous Books by the Author
Un-armed Combat - "Defendu," "Scientific Self Defense", "Get Tough", "Hands Off".
Pistol - "Shooting to Live" (Co-Author)
PREFACE.
We believe that the time has arrived when the bayonet should be discarded as no longer effective and like the Pike placed amongst the weapons of the past.
There can be no doubt, once you have handled a scientifically designed Fighting Knife, that you would prefer it to a Bayonet, especially if the fighting was to take place under any of the following conditions - over roof tops, up or down stairs, climbing up ships sides, crossing streams up to your waist in water, in dense jungle, or through paddy fields. Under such conditions, a bayonet attached to a rifle would be a severe handicap.
We are aware that there are many who will disagree with this; also that some of them will come back with - "The bayonet has won more wars that any other weapon." Be this as it may, we still contend know that any advantage gained by having a bayonet attached to a rifle or other firearm, is cancelled-out threefold by the loss of balance and illegible it causes to the in the weapon to which it is attached. Be this as it may, we still contend that it should be replaced by a well balanced fighting knife.
To prove our point, let us trace the history of the bayonet - (a) Korean War, (b) World War I, (c) World War II, (d) South African War.
During (a) and (b) no reports were received of the bayonet having been used to any great extent, but in (c) the bayonet was reported to have been very effective in Trench fighting, also during the South African War it was put to good use. Here Fairbairn plainly means to deprecate the bayonet in the Korean Conflict and World War II, but miss-writes himself.
This rather tends to show We admit that the bayonet was a very effective combat weapon in the bygone days but with the advent of the Flame Thrower, Sub-Machine Gun and Hand Grenade, (all close-quarter weapons) what chances has a Bayonet Charge of being successful? The claim that the psychological value of the bayonet in building up the moral of the Troops is such that its retention is more than justified, does not make sense.
Paratroopers frequently need a knife to cut themselves free and there are numerous other occasions when a good knife would be invaluable. In addition, there are times when it would be inadvisable to fire a pistol, [or other firearm] on account of raising an alarm.
Those who carry an Auto-Pistol, or Revolver, or Tommy Gun are aware that they are restricted to a limited number of rounds and dread the thought of being caught with an empty gun. Yet it is an established fact that once contact is made and the firing starts, it is only a matter of seconds before the one hand gun is empty, after which, it would not make a respectable club. We contend that at such a time, it would be a very comfortable feeling to know that one had a well balanced fighting knife handy.
There are many who will regard this as rank heresy, or worse. I shall be content for the present if the reader will concede me at least a title to my views and I hope to fortify the title subsequently by statistics of actual results of shooting affrays with one-hand-guns over a number of years which took place in Shanghai.
When I joined the Special Training Centre of the British Commandos (1940), the Authorities did not recognize a fighting knife as part of the equipment of the Fighting Services. In fact, such a thing as a fighting knife could not be purchased anywhere in Great Britain.
To meet the many requests, I designed the "FAIRBAIRN" knife and managed to persuade the Wilkinson Sword Company to manufacture it privately from a number of old bayonets they had in stock, personally guaranteeing the sale of three hundred. The day they arrived there was a near riot in the rush to buy them. Shortly after this official recognition was given to the Fighting Knife. This same knife was just as popular with members of the Armed Forces of the U.S.A. and a number of Units were issued with it as part of their normal equipment.
There is something about a good [well balanced, razor sharp] fighting knife that appeals to the majority of fighting men, irrespective of nationality. I contend that this is on account of that feeling of confidence which such a knife gives its owner, which is apparently so much greater that that which one receives from any other weapon. Especially is this so when one is operating in the dark.
A recruit, trained in Knife Fighting and equipped with a well balanced, razor sharp knife, has a wonderful psychological advantage over an opponent who has not received such training. This is clearly demonstrated when operating in the dark, or on Forward Sentry duty. Many a man has testified that immediately he drew his knife, his confidence returned and he was no longer afraid. This confidence is apparently so much greater than one receives from any other weapon.
Certain individuals will never make Knife Fighters. They have an aversion to using a knife and no amount of instruction will make any difference. In this connection I had a V.I.P. student sent to me for private instruction in Close Combat Fighting (Pistol, Sub Machine Gun, Carbine, Un-armed Combat and Knife). He was six feet seven inches in his socks, over 300 lbs. in weight and had the largest pair of hands I have ever seen. At that time my weight was 160lbs. and I was not looking forward to the Un-armed Combat session of the training.
The student duly qualified in the first three subjects and during a "break" period, I learned something of his "back-ground" (Professional All-In Wrestler). That decided me to cut the un-armed combat (Judo) and pass on to the Knife Fighting. Despite the student's colossal strength (he actually lifted me above his head with the greatest of ease), I knew, Immediately I drew a concealed knife and made a few passes near his face, that I could, by means of a knife, bring him down to my own weight and strength. [Immediately I drew a concealed knife, I knew that the fear of a knife brought him down to my own weight and strength]. One might say "you could hear his shoulder blades click" as he jerked himself backwards out of reach.
EXTRACTS FROM SHANGHAI MUNICIPAL POLICE RECORDS (SHOOTING AFFRAYS)
The records of the shooting affrays referred to earlier show that there were no less than six hundred and sixty-six armed encounters in which Pistols were used by the Police and criminals. On several of these encounters as many as twenty Policemen and criminals were fighting from room to room, etc.
During these encounters, on no occasion did anyone RE-LOAD his PISTOL whilst he was BEING FIRED AT.
Members of the Force, when questioned as to why they had not immediately re-loaded, could not offer any reason for failing to do so. Could it be, that under such circumstances, it is a mental as well as a physical impossibility to do so?
The fact remains, that no one re-loaded.
Note - So that the reader will not think that the reason for failing to re-load was owing to the lack of proper training, let me here state that the Shanghai Municipal Police had the most up-to-date IN-door Pistol Range in the world. Their quarterly Pistol Practices were conducted under conditions as near as possible to those they had to contend with whilst on duty - firing up and down stairways, over roof tops, from and in to windows, sometimes in very poor light or with no light at all. Twelve shots in all, (which necessitated changing of magazines), with point deducted if caught with an empty pistol.
I have a very high opinion of the fighting value of the Tommy and one-hand-guns. This is based on my 40 years experience of these weapons, which includes not only armed encounters with armed criminals but the responsibility for instructing large numbers of Police and Soldiers, etc., of many nationalities in various parts of the world. Despite this I still say - THAT A GOOD FIGHTING KNIFE IS AN ABSOLUTE ESSENTIAL FOR ALL MEMBERS OF THE ARMED FORCES.
W.E. Fairbairn, Lt.-Col.
1955.
No. 1 STANCE.
"THERE IS NO SUCH THING AS A CORRECT STANCE FOR KNIFE FIGHTING."
Having made this statement, we will justify it:-
The situations you are liable to have to contend with are very seldom of your selection and frequently they may vary with every step you take. You may be running; going up or down a slope or stairway; up to your ankles in a mud patch, or up to your waist in water. In fact, the situations are astronomical in number. Under such circumstances all the student can do is to remember that, as far as possible, he should try to achieve a crouching stance, with knees and waist as flexible as possible. (Fig. 1.)
No. 2 THE GRIP.
1. Hold the knife in the right hand, the thumb full length along the back of the hilt, the knife resting on the index finger, between the first and middle joint. (Fig. 2.)
2. Close the three remaining fingers over towards the fleshy part of the thumb. (Fig. 3.)
Note - The position of the thumb and fingers will vary according to their thickness and length. To find the most suitable grip for yourself, grip the hilt firmly, and if necessary allow allowing the tip of the thumb to go forward on the back of the blade. (See Fig. 3.)
WARNING - When making a slashing cut to the RIGHT, grip hold the hilt of knife with as firm a grip as possible. At all other times, the grip should be mainly with the fingers and thumb.
Students are warned that the hilt of the knife is only gripped with the full strength of all fingers and thumb ONLY when making a LEFT slashing Cut, or Thrust. At all other times, the knife is mainly held by the fore-finger and thumb, with the fingers only maintaining a loose grip. (See CAUTION Page 8.) [Refers to Exercise No. 8 of manuscript].
Note - This closing an relaxing of the grip will become automatic after a very little practice.
The manner in which edged weapons are initially grasped by the wielder governs the manner in which they are carried and withdrawn, and influences both weapon design and the dynamics of initial maneuver. We therefore observe that the foundation of every knife fighting technique is grip.
The knife is controlled by the thumb and forefinger. The former provides power and the latter precision. The placement of thumb and forefinger is thus the foundation of grip. Precisely how the thumb and forefinger are placed is a function of weapon design, culturacy idiosyncrasy, personal preference, and a host of other factors.
The above factors hold true regardless of whether one employs a prison-made "shank," or a fencing foil; they are a function of the motility of the human hand, and reflect mind-body interaction norms.
No. 3 EXERCISE "A".
1. Holding the knife in the right hand, arm shoulder high, forearm bent, back of the hand up, knife over the left shoulder. (Fig. 4)
2. Whip the forearm out towards the right, to the full expectant of the arm. (Fig. 5)
3. Arm shoulder high - reverse the hand - back of the hand down. (Fig. 6)
4. Whip towards the left, allowing the arm to bend to the original position, as in Para. 1. Now reverse the hand back to the original position. (See Fig. 4)
Note (a) Having mastered the shoulder high exercise, vary the height of the arm and occasionally reach down towards the ground.
Note (b) Remember that your opponent is liable to attach from your right, left, or even from behind. Practice changing your position quickly, to cope with this.
Assuming you are fighting with a knife against a knife, it is wise to never lower the arms below the navel or raise them above the shoulders.
No. 4 EXERCISE "B" - THE "WHIP"
1. Holding the knife as in (Fig. 4), back of the hand UP, whip the knife sharply towards the right, in a like manner to "cracking a whip by a flick of the wrist.
2. Gradually increase the length of the "whip" from 12 inches to as far as you can reach. (Fig. 5)
3. Holding the knife as in (Fig. 7) back of the hand DOWN. Whip the knife to the left and then continue as in Para. 2
CAUTION - When making the "whip" to the LEFT, the grip on the hilt should be mainly by the index finger and the thumb. The other fingers should only be loosely on the hilt. Particular care must be paid to this otherwise the tendons of your wrist or arm may be strained.
NOTE - Even although you put all your strength into your grip and carry out your the RIGHT "whip" with the utmost speed, you will not strain the tendons of your wrist or arm. (Figs. 4 & 5).
No. 5 EXERCISE "C" - "FIGURE OF EIGHT".
1. Holding the knife as in (Fig. 8), back of the hand UP, forearm parallel with ground, elbow close to body, point of knife at START (Fig. 9) slowly follow the arrow to "A".
2. Between "A" and "B" reverse the back of the hand to DOWN, then continue to "C".
3. Between "C" and "D" reverse the hand to its original position, (back of hand UP).
4. Having mastered the technique of turning the hand over, gradually increase to the fastest possible speed.
5. Now repeat the above, with the arm fully extended, occasionally changing to a bent arm or trying to touch the ground with the knife.
Note - An expert Knife Fighter keeps his knife always on the move - making it dart in and out like a snakes-fang and occasionally changing his position and the height of attack.
No. 6. EXERCISE "D" - THE SLASHING CUT.
(Suspend a vegetable from a tree, etc., at about shoulder height.)
1. Hold the knife as in Fig. 10 - back of the hand DOWN. Stand slightly less than arms length and to the right of the object. Make a slashing cut to the left, by a circular inward motion of your arm and wrist, cutting the vegetable in half.
Note - Cutting the vegetable in half by this LEFT SLASH is considerably more difficult to perform than it is when slashing to the RIGHT, but the Student must first master the LEFT before attempting the RIGHT.
2. Hold the knife as Fig. 11 - back of the hand UP - stand slightly less than arms length and to the left of the object. Make a slashing cut to the right by a circular outward motion of your arm and wrist.
Note - During both the RIGHT and LEFT SLASH, the body must turn in the direction of attack. This permits you to carry out a "follow-through" motion of your arm.
3. Students having mastered both the LEFT and RIGHT SLASH are recommended to try the DOUBLE SLASH. Cutting the vegetable in half with the Left Slash and then cutting the falling piece by means of a Right Slash, before it reaches the ground.
Note - This calls for the utmost possible speed if you are going to catch the falling piece of vegetable before it reaches the ground.
CAUTION - When this DOUBLE SLASH is being practiced, all persons should be at least ten feet away. This is a precautionary measure during the initial training of a recruit, in case he should loose his grip of the knife.
NO. 7. EXERCISE "E" - THE THRUST or POINT.
1. Hold the knife as in Fig. 12, with the FLAT SIDE UP. It should be noted that when the "COBRA" Fighting Knife is held in this manner that it is a prolongation of the arm and the point is in alignment with the thumb. (This permits the thrust to be made with accuracy, without having to worry if the back of the hand is UP or DOWN.)
Bring the left foot forward directly back of the right and make an instantaneous forward lunge - by stepping off with the right foot, accompanied by a gliding thrust forward with your forearm. (Fig. 13.) Danger of one's knife becoming entangled in the clothing or equipment of an adversary renders the thrust into the throat advisable.
Note - The position of the feet (STANCE) has an important bearing upon the successful application of the Thrust.
CAUTION - When you have more than one opponent to deal with, it is inadvisable to attempt a thrust at one of them. The reason for this is obvious. When making a "Thrust" you are in a lunging position, with your arm extended forward to its full length, leaving you "wide open" to attach by one or more of your other opponents.
No. 8. THE CIRCULAR-BACKWARD SLASH.
1. The Circular-Backward slash is a continuation of the slash to the Right and is usually made from shoulder height. Knife held as in (Fig. 4) (Back of hand UP - knife over the left shoulder - See No. 3 Exercise "A" Page 6.) [Refers to Page Six of manuscript]
2. On the command GO, make a right slash, the full length of the arm, simultaneously jump and twist the body as far around as possible, aiming to strike your opponent's face.
Note - Providing this slash is made with the utmost possible speed and strength, the momentum of the right arm will considerably help in twisting the body around.
CAUTION - Only one student must be exercised at a time during this exercise. The remainder including the Instructor, must be at least 20 yards in the rear. This is a precautionary measure and should be strictly adhered to, until such time as the students have shown that they can retain their grip upon their knives.
ADVICE - Students should be encouraged to practice this exercise at every available opportunity. In the event of insufficient room, Tap Dancing is a good loosing-up exercise.
No. 9 EXERCISE - SHADOW-FIGHTING
It has frequently been said that our methods of instruction, because they are unorthodox, are not practical. Our answer to that is:- He who attacks in an unorthodox manner, has the element of surprise in his favor. Further, we have had students of many nationalities pass through our hands, a number of whom have, on their return from active services, stated -
THEY WERE ALIVE, ONLY BECAUSE OF THE TYPE OF TRAINING THEY HAD RECEIVED.
This, we contend, is full justification for the soundness of our unorthodox methods.
Note: Fairbairn's professional reticence prevented him from fully disclosing the precise character of his most celebrated students: the men and women of the Special Operations Executive and the Office of Strategic Services. These individuals and their exploits were the ultimate test of Fairbairn's methods and the greatest testament to his success.
Part "A". Shadow-Fighting. (In open country)
Warning - For obvious reasons, only one student should be exercised at a time. The remainder should remain in the rear "at ease" and told to provide "off stage noises".
1. The student should be briefed, somewhat as follows -
a. You are making your way in the dark through the Enemy's Lines and are liable to be attacked from all sides.
b. On the command GO you will draw your knife and advance at the run in the direction indicated. You will be given the direction from which the attack is coming and will immediately counter-attack with a slashing-cut or thrust as the imaginary enemy. In the event of being tripped or falling down, you must continue fighting, getting up as quickly as possible and advance until ordered to stop.
2. The Instructor will keep approximately ten yards in the rear during the advance, calling out the direction the student is being attacked from, somewhat as follows -
BEHIND YOU - RIGHT - LOW LEFT - HIGH RIGHT, etc.
Note: - These commands should be given in quick succession and the student constantly urged to put more weight in to his slashes with the knife.
Instructors Note:- This "Shadow-Fighting" is a very strenuous exercise and the distance covered in the attack, in the initial stages of the training, should not exceed 50 yards. Each student should be given a ten minutes "Rest" after completing the course.
Part "B". Shadow-Fighting. (Down a wooded slope.)
Note - Where possible select a slope with second-growth trees. Where they permit, these trees should be grasped with the disengaged hand, permitting you to make a leap downward of several feet.
1. Students not taking part in the exercise will be "At Ease" on the top of the slope and instructed to provide the "Off stage noises".
a. The Student should be briefed as follows:- On the command - GO - you will jump down the slope (drawing your knife) and continue as fast as possible, in the direction indicated. You will be given the direction from which the attack is coming and will immediately counter-attack with a slashing-cuts, etc. at the imaginary attackers.
2. The Instructor will direct the attack from the top of the slope - using a megaphone if necessary and insisting that the attacks swiftly and with full strength.
Note - The commands should be given somewhat as in the previous exercise.
In 1955, the above was considered unorthodox and, unkindly, a trifle foolish. Today we know a good deal more about the power of pre-visualization exercises. We have also relearned what we once (in an era gone by) knew about physical conditioning for edged weapons. Any exercise that tends to lend strength and agility to the Latissimus Dorsi, Fascia Infraspinata, Infraspinatus, Teres Minor, Teres Major, and Serratus Anterior muscles of the back and arm is to de desired as it is these muscles which serve the fighter fighter best in the darting thrust and slash attacks.
No. 10 THE "RETREAT"
"A" An opponent, armed with a knife, should never be allowed to approach within five feet. At that distance, or less, he is a very dangerous man. (This is not so difficult to understand when you realize that the length of a man's arm, plus the knife, is approximately three feet, thus leaving only two feet to be covered to make contact with the knife on your person.) There are two ways of dealing with such a situation -
1st. IF YOU ARE ARMED - shoot him before he is within five feet distance.
2nd. IF YOU ARE UN-ARMED - turn and run.
Note - Fear will most likely give you that additional speed to out-distance your opponent.
An individual of average (5'8") stature, throws a snap-type strike extending approximately 2' 7". The strike terminates before the arm is fully extended, thus exploiting maximum speed and guarding against the possibility of a "locked joint," in this case, the elbow.
THE ATTACK
"B" Now let us reverse the above situation. You are the one who is attacking with a knife. Approach to within the required distance, right hand on the hilt of your knife (not drawn), your left forearm covering your right hand. (Fig. ...)
Note - By covering your right hand with your forearm, your opponent is not receiving advance "information" of your intention to attack.
Having decided to attack - spring forward, simultaneously drawing your knife and make a LEFT slash at your opponent's face. In the event of a near-miss, your opponent will be back on his heels, off balance and wide open for the return RIGHT slash.
Note - A near-miss at an opponents face, with any weapon, always produces the same results. He instinctively throws his head back, which sets him back on his heels and off balance.
No. 11. ATTACK POINTS.
In close-quarter fighting there comes a time when weapons have to be re-loaded. This is the time when a well balanced fighting knife, in the hands of a man trained to use it scientifically, becomes the most deadly weapon it is possible to have.
In the accompanying diagram (Fig. 14.), the approximate position of the arteries are given. They vary in size from the thickness of one's thumb to that of an ordinary pencil. Naturally, the speed at which loss of consciousness or death takes place will depend upon the size of the artery cut.,
Certain arteries are more vulnerable to attack than others, because of their being nearer the surface of the skin. Don't bother about their names so long as you can remember where they are situated.
The psychological effect of even a slight wound in the stomach is such that it is likely to throw your opponent into confusion.
POSITION OF CARRYING THE "COBRA" FIGHTING KNIFE.
The COBRA Fighting Knife was designed to be carried on the left side of the belt. The sheath has been fitted with a canting loop, which brings the hilt of the knife within comfortable reach of the right hand and permits you to run or sit down in a car, etc., without having to push the knife around to the back of the body (Fig. ...), where it would be impossible to make a "quick draw".
There are other positions in which the knife can be carried but it is essential that the position selected brings the hilt of the knife within easy reach of the drawing hand.
Paratroopers find, owing to the nature of their calling and the additional equipment they have to carry, that the knife is best carried in the top of the boot or strapped to the leg or thigh. When carried in these positions, it is essential that the sheath is firmly secured, so that it will not "ride" in any direction. Also, the hilt MUST BE perpendicular so as not to catch up in the branches in the event of a "tree landing".
DIS-ARMING A KNIFE FIGHTING OPPONENT??
We are frequently being told of Judo Experts who claim that they can dis-arm a man attacking them with a knife without the aid of any weapon - in other words - with their bare hands. Also we have a copy of a Military Training Bulletin, in which the author lays down how the recruit should be instructed to do the same thing.
It is apparent that neither the Judo Expert nor the writer of the Bulletin have ever seen an expert knife fighter in action or even at practice, otherwise, they would know that had they attempted to dis-arm him, they would, in a matter of a split second, be minus a few fingers or an ear - that is, if they were so fortunate as to be still alive.
We have no objection to the Judo Expert making this statement or to him continuing to teach his STAGE DIS-ARM but we get "very hot under the collar" when those responsible for the training of our young men for Combat duty, publish Training Manuals in which they state and show photographs of a man being dis-armed by an Instructor with his bare hands.
NOTE - The Author again wishes to go on record - IF YOU ARE UN-ARMED - "THERE IS NO DEFENSE AGAINST AN OPPONENT ATTACKING WITH A KNIFE".
Scientific studies have shown that the recorded speed of a forward snap-type strike originating from waist-level is 5.7 to 9.8 meters per second, or approximately 19 to 32 feet per second. The hand reaches maximum speed shortly before the arm is fully extended, and travels faster on the return stroke than on the forward stroke.
Based on the above, it can be estimated that it takes one-sixth of a second or less to execute a snap-type knife strike. This assumes an average speed of 32 feet per second and a total distance of 62 inches.
Stress reaction time to any stimulus is approximately one-fifth of a second.
It is for the above reasons, among others, that we state there is no means by which an unarmed man can defend against a knife fighter.
Still, it must be acknowledged that there may come unfortunate circumstances in which one has no other choice but to make an attempt. In such unpleasant cases, usually played out at the end of an alley or in confinement, the following guidelines may be of some small value if there is no place to run and no place to hide:
1. Obtain the advantage of distance. Stay as far away from the blade as circumstances permit.
2. Move continually. Stay in motion, especially with multiple attackers. Move at least three feet in each second.
3. Concentrate on the knife. Do not be fooled by watching the attacker's eyes, hands, or any other part of his or her body. Pay attention to the knife.
4. Pay attention to timing. Semi-skilled and crude attackers manipulate knives according to an individual rhythm, usually of a very rapid nature. Be aware of this.
5. Do not close with your attacker. If you have no means of escape, allow him to close with you.
6. Evade the weapon before you counterattack. First get out of the way of the blade. If you must absorb cuts, try to avoid absorbing them with your arms and hands by using your feet. Note - this is "last ditch" advice!
7. Attack the forearm and the wrist simultaneously. Do not attack the hand. Attempt to immobilize the hand that holds the knife as rapidly as possible, then break the hand, wrist, elbow or arm. Strike the bridge of your attacker's nose with your head.
8. Never go to the ground with an attacker. Try to stay on your feet at all costs.
9. Do not "protect" wounds. If you are attacked by surprise and stabbed, and you cannot run, do not shrink back or "cover" your wounds as this will render your arms and hands vulnerable. At this stage, your arms and hands are your only means of defense. IMMEDIATELY counterattack the attacker's knife arm, or, in the alternative, "climb" your attacker using the remaining power in your legs. Be advised that most wounds result in a weakness in the legs, arising from the body's natural response to loss of blood.
10. Do not wrap a coat around your arm. Do try to find an expedient weapon, such as a belt or a stick.
Note: I have studied this issue for more than twenty-five years and have experienced the attentions of the finest instructors in the world. Please be assured that no martial arts school or technique can offer a predictable method of defense against a knife, and most of the techniques and methods one sees are suicidal against a knife fighter.
Copyright © 1999 by William L. Cassidy
Assinar:
Postagens (Atom)